Nové Doručení zdarma Vodní pumpy EWP80 Alloy - Remote Electric Water Pump (12V) | race-shop.cz Zobrazit větší

*413 904   

Davies Craig

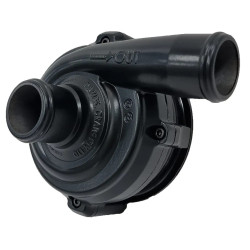
EWP80 Alloy - Remote Electric Water Pump (12V)

The EWP®80 Alloy Electric Water Pump – simple, do-it-yourself, easy to install, designed to complement or replace your existing belt-driven, mechanical water pump. Key specs: 90 L/min (23.8 US gal/min) @ 0 kPa flow rate; 7.5A @ 13V max current.

Nový produkt

Na objednávku : 10+Ks

U vás doma nejpozději: 11. 9.

4 079 Kč s DPH

8109   

9311669081097

Dotaz na zboží

Dotaz na zboží

EWP80 Alloy - Remote Electric Water Pump (12V)

EWP80 Alloy - Remote Electric Water Pump (12V)

The EWP®80 Alloy Electric Water Pump – simple, do-it-yourself, easy to install, designed to complement or replace your existing belt-driven, mechanical water pump. Key specs: 90 L/min (23.8 US gal/min) @ 0 kPa flow rate; 7.5A @ 13V max current.

Pošlete obsluze obchodu dotaz k tomuto produktu.

* povinný údaj

  nebo  Zrušit

Informujte mě o naskladnění

EWP80 Alloy - Remote Electric Water Pump (12V)

EWP80 Alloy - Remote Electric Water Pump (12V)

Pokud chcete být informováni o naskladnění produktu prostřednictvím e mailu vyplňte formulář.

* povinný údaj

  nebo  Zrušit

The EWP®80 Alloy Electric Water Pump – simple, do-it-yourself, easy to install, designed to complement or replace your existing belt-driven, mechanical water pump. Key specs: 90 L/min (23.8 US gal/min) @ 0 kPa flow rate; 7.5A @ 13V max current.

The EWP80 Alloy Electric Water Pump – simple, do-it-yourself, easy to install, designed to complement or replace your existing belt-driven, mechanical water pump. It will fit most vehicle makes and models and can be installed on the bottom radiator hose of most vehicles equipped with naturally aspirated engines up to two litres (2000cc).

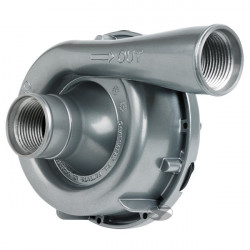
The revolutionary, Australian-designed EWP80 Alloy is made from lightweight aluminium which offers great thermal conductivity and incorporates a ceramic faced seal for long-life durability. With a maximum flow rate of 90 l/min (23.8 g/min) and 35mm (13/8”) inlet/outlet, it features a matt-black, powder-coated finish for a premium look.

Purchase options

  • Option: Pump Only; Part DC: DC8109; Notes: EWP® 80 Alloy 12V pump only.
  • Option: Kit; Part DC: DC8009; Notes: Pump kit option (see kit details for full contents).
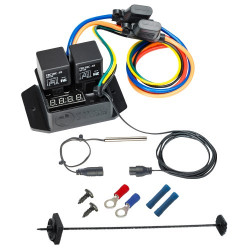
  • Option: Combo with Controller; Part DC: DC8919; Notes: Combo pack with controller solution (controller also available separately).

Contents (Part DC8109)

  • EWP® 80 (Alloy) 12V: 1
  • Installation Instructions: 1

Technical specifications

  • Operating voltage: 13.8V DC 16V MAXIMUM
  • Max current: 7.5A @ 13V
  • Flow rate (max): 90 L/min (23.8 US gal/min) @ 0 kPA
  • Maximum head height: 5.2m (17ft 0.72in)
  • Operating temp.: -40° to 120°C (-40° to 248°F)
  • Fluid temperatures: -40°C to 120°C (-40°F to 248°F)
  • Pump weight: 1025 grams (2.26 lb)
  • Motor type: Brushed DC Motor
  • Body material: Aluminium
  • Burst pressure: 500 kPa (72.52 Psi)
  • Inlet & outlet: 35mm (1 3/8 in) Push on barb
  • Hose fitment: 32mm to 38mm (1¼” to 1½”)
  • Hose fitment with 3mm Sleeve DC8510 *Not included: 41mm to 44mm (1⅝” to 1¾”)
  • Hose fitment with 6mm Sleeve DC8511 *Not included: 47mm to 50mm (1⅞” to 2”)

Installation demonstration & controller overview

EWP & Controller Installation Demonstration

Combined with an LCD EWP/Fan Digital Controller (Sold separately Part DC8002 or EWP Combo Pack) will manage both the EWP and Thermatic fan operation. The Digital Controller will vary the speed of the EWP in response to the engine’s coolant temperature. Multiple temperature settings are provided on the Controller for either maximum power or fuel efficiency. The Thermatic Fan/s will be activated automatically once the engine coolant rises 3°C (5.4°F) above the targeted (set) temperature. The Digital Controller will automatically run on for three minutes (or to 10°C / 14°F below the set temperature) after engine shut down, eliminating ‘heat soak’ and extending engine life. The EWP Controller Combo Pack is supplied in a do-it-yourself kit with everything you need for fitment to your vehicle’s engine, including an easy-to-follow DIY instruction booklet.

Key benefits

  • universal fit
  • more power
  • more cooling
  • increase fuel efficiency
  • extend engine life
  • world-leading technology

EWP® installation options

Installing an EWP® as an AUXILIARY PUMP

  • Leaving the mechanical water pump in place, install the EWP into the bottom radiator hose.
  • Remove the thermostat and drill two approx. 3mm (1/8") holes in the thermostat plate to allow some coolant circulation when the thermostat is closed. Re-install ensuring that the thermostat housing is clean and a new gasket is used if required.

EWP® INSTALLATION – disabling Mechanical water pump

  • Leaving the mechanical water pump in place, install the EWP into the bottom radiator hose and remove the manufacturer’s thermostat.
  • You will need to bypass the water pump pulley by installing an appropriate length belt (not supplied). This method makes for an easy installation.
  • If running the pump continuously remove the thermostat and drill two approx. 3mm (1/8") holes in the thermostat plate to allow some coolant circulation. Re-install ensuring that the thermostat housing is clean and a new gasket is used if required.

In both these cases, the EWP will pump past the impeller of the mechanical water pump.

Disengaged mechanical water pump (recommended)

  • Remove the mechanical water pump and remove the thermostat.
  • Then remove the impeller from the mechanical pump shaft. Retain the mechanical water pump using the pump pulley as an idler to avoid re-routing the drive belt.
  • Block any bypass passages and re-install the disengaged water pump ensuring that all gasket surfaces are clean and the new gaskets are properly fitted to prevent leaks.
  • Install the EWP into the bottom radiator hose.

Removed mechanical water pump (Ideal)

  • Remove the mechanical water pump and thermostat from the engine.
  • Install a Davies Craig EWP Header Adaptor or blanking plate (not supplied). Ensuring the gasket surfaces are clean and the appropriate gasket or sealant is used to prevent leaks.
  • Install the EWP into the bottom radiator hose. This method will require you to modify or replace the standard radiator hose.
  • Install an appropriate length belt (not supplied) to drive the accessories.

In most cases EWP® will be adequately supported by the radiator hose. Where mounting is required, the EWP® must be soft mounted to protect against vibration. For the EWP® 115, EWP® 140 and EWP® 150 Part DC8700 or DC8710 Mounting bracket is recommended.


Napsat recenzi

Napsat recenzi


  nebo  Zrušit

Nenašli jste odpověď?
Položit otázku
Máte otázku? Vyhledejte si odpověď v diskusi.


Recent posts

Garrett PowerMax pro motory 1,9 TDI

Plug & Play řešení pro zvýšení výkonu
Read more
Intercoolery Races Motorsport

Nová evoluce intercoolerů Races.
Read more
Sportovní podvozky

Cesta k lepším jízdním vlastnostem: Jak si vybrat správný podvozek?
Read more
Garrett Powermax Fiat 500 Abarth

Powermax přináší více výkonu pro kapesní raketu Fiat 500 Abarth.
Read more
Garrett Motion

Garrett Motion je globálním technologickým lídrem v oblasti přeplňování. Technologie vyvinuté v monopostech Formule 1 aplikuje také do běžných sériových vozů.
Read more
Přilby BELL

Jak si vybrat správnou helmu od BELL Racing?
Read more
Legální úprava auta? Jak na to?

Jak vylepšit své auto a nepřijít o technický průkaz?
Read more
Jak nainstalovat sportovní sedačku?

Jednoduchý návod, jak si vybavit interiér sportovní sedačkou.
Read more
Jak si vybrat hliníkové disky pro své auto?

Informace a důležité výrazy, které by měl znát každý automobilový nadšenec pro správný výběr disků.
Read more

Kategorie Výrobci

Loading...